Unit 7: Git - Working with Remotes
Table of Contents
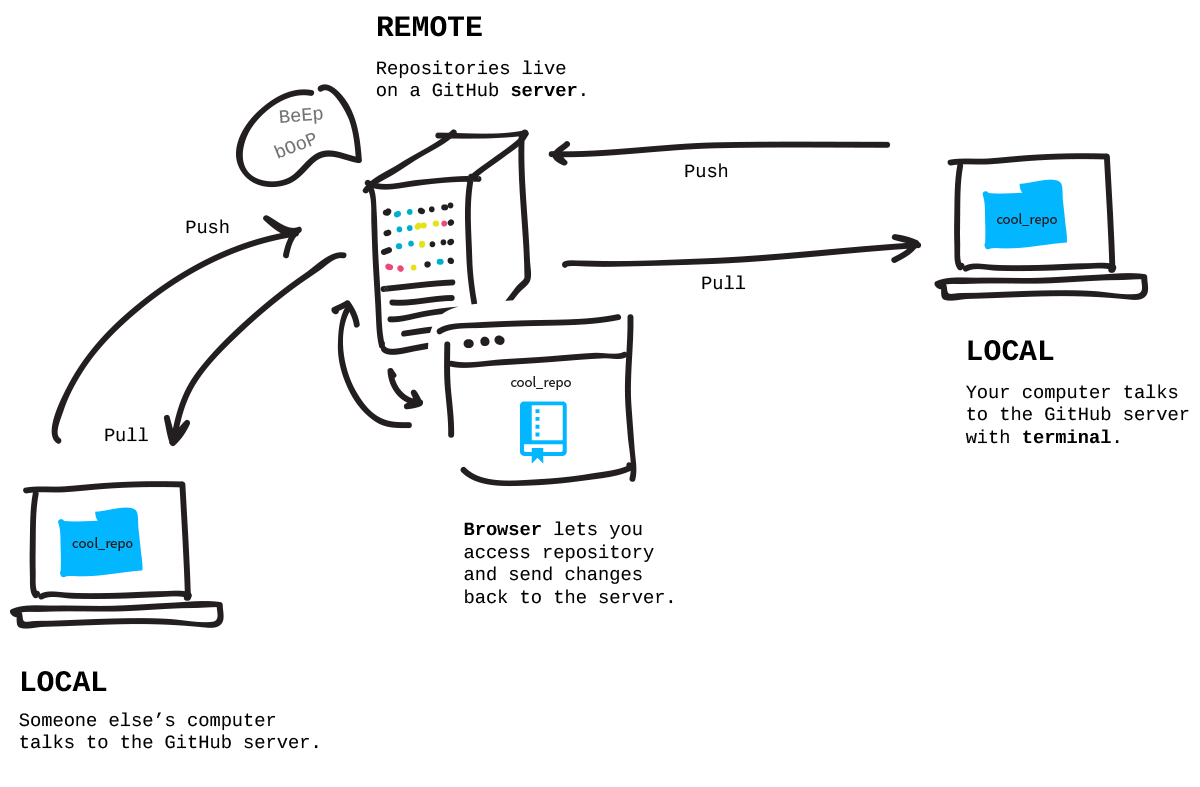
Working with Remotes
So far everything that we’ve done with Git has been on our local device. However, in the real world, we need to collaborate with others. Thus, there needs to be some central location where code can be stored and accessed by all parties.
This location is the remote repository. Remotes can be hosted on various websites. Usually, teams will use GitHub because of its cool features. Alternatives include GitLab or BitBucket.
Remote repositories are exactly what they sound like - they store a copy of the repository online. This includes things like commit history and branches.
This is where it starts to get a bit confusing, because now we have multiple versions of branches: local branches on team members’ computers, and the remote branch that belongs to the remote repository. But have no fear! By the end of this lesson, you’ll be working with remotes in no time.
git clone
Use git clone to clone (download a copy) of a remote repository to your local device.
$ git clone <url>
Where <url> is the URL of the remote repository.
For example, if you wanted to clone the Learn Code repository, you would write:
$ git clone https://github.com/omega9656/learn-code.git
Cloning into 'learn-code'...
remote: Enumerating objects: 585, done.
remote: Counting objects: 100% (585/585), done.
remote: Compressing objects: 100% (309/309), done.
remote: Total 4312 (delta 330), reused 447 (delta 240), pack-reused 3727
Receiving objects: 100% (4312/4312), 21.48 MiB | 7.11 MiB/s, done.
Resolving deltas: 100% (2576/2576), done.
Notice that the remote URL is simply the URL of the repository with .git tacked on to the end.
git clone will also automatically set up your local repository to track the remote repository. Alternatively, if you started a Git repository locally and now want to link it up to a remote repository, you’ll need to use git remote.
Note: Make sure you use git clone in the parent directory of the project.
git remote
The git remote command allows you to perform various actions related to remote repositories. By itself, git remote will list the names of the remotes that your repository is currently linked to. For example:
$ git remote
origin
You’ll notice the word origin a lot. That’s because it’s the default name which refers to the remote repository. You can technically call it something different if you want.
-v
Use the -v flag (for verbose) to display more details about the remotes associated with your local repo. For example:
$ git remote -v
origin  https://github.com/omega9656/learn-code.git (fetch)
origin  https://github.com/omega9656/learn-code.git (push)
add
Use git remote add to add a remote to your local repository.
$ git remote add <name> <url>
For example, the following adds the Learn Code repo as the remote and names that remote origin.
$ git remote add origin https://github.com/omega9656/learn-code.git
remove
Use git remote remove to remove a remote from your local repository.
$ git remote remove <name>
For example, if I had a remote called origin associated with my local repo, I could remove it like so:
$ git remote remove origin
Note: If you’re using an older version of Git, you may need to replace remove with rm.
set-url
If you only want to change the URL of the remote repository, you can use git remote set-url. (This is usually used if you typed the remote URL incorrectly or if the remote URL has changed.)
$ git remote set-url <name> <newurl>
For example, if I had a remote called origin and I wanted to change its URL to https://github.com/dusty-the-dog/learn-code.git, I would use:
$ git remote set-url origin https://github.com/dusty-the-dog/learn-code.git
git push
Let’s say you have your remotes set up and ready to go. You make some changes on your local device, and you think they’re ready to be incorporated into the remote repository so that your teammates can see your work and edit it on their own computers. How would you move your code to the remote? The answer is to use git push.
git push basically uploads your changes (this includes commit history) to the remote repository. Not surprisingly, this is referred to as pushing.
The general form of a git push looks like this:
$ git push <remote> <branch>
What this means is that you are pushing the changes you made on your local branch (whatever that may be) to the remote branch that you specify.
If you do not specify a remote, it will default to origin. If you do not specify a branch, it will default to the branch you are currently on.
For example, if I wanted to push changes to the master branch of the remote repo, I would do:
$ git push origin master
Enumerating objects: 52, done.
Counting objects: 100% (52/52), done.
Delta compression using up to 8 threads
Compressing objects: 100% (42/42), done.
Writing objects: 100% (42/42), 9.69 KiB | 3.23 MiB/s, done.
Total 42 (delta 33), reused 0 (delta 0), pack-reused 0
remote: Resolving deltas: 100% (33/33), completed with 7 local objects.
To https://github.com/omega9656/learn-code.git
   6b663c6..67616c1  units -> units
Notice that at the bottom of the output, it tells you to what remote you just pushed to, the commit hashes, and the branches.
Pushing for the First Time
If you are pushing for the first time, you will need to use the -u (for set upstream; --set-upstream is also equivalent) flag:
$ git push -u <remote> <branch>
Basically this sets up the branch so that it tracks the “upstream” branch, which is basically the remote repository’s version of the branch.
After you have set this up, you can simply use git push to push changes.
git fetch
Now let’s say that you decided to take a break from programming. When you come back, you get a message from a teammate saying that they’ve pushed some changes to remote and want you to make some edits locally. How do you get the new code from remote? You use git fetch.
git fetch fetches (basically downloads) any changes from remote since you last fetched. It seems like the command does nothing when you run it. For example, here I am using git fetch to fetch changes from the Learn Code Unit 7 repo:
$ git fetch
remote: Enumerating objects: 37, done.
remote: Counting objects: 100% (37/37), done.
remote: Compressing objects: 100% (28/28), done.
remote: Total 37 (delta 7), reused 27 (delta 1), pack-reused 0
Unpacking objects: 100% (37/37), 5.27 KiB | 234.00 KiB/s, done.
From https://github.com/omega9656/learn-code-unit-7
 * [new branch]      master           -> origin/master
 * [new branch]      new-radical-idea -> origin/new-radical-idea
Sure, there’s output printed, but if you look at your working directory, nothing has changed. That’s because you need to merge the changes manually from remote into your local branch using git merge. This is good if you want to get changes from remote but you might be working on something locally and you don’t want to mess it up.
git pull
For those of you who would rather do less typing and/or live more dangerous lives, you can use git pull to get changes from remote and merge them immediately into your local repo.
In a nutshell, git pull = git fetch + git merge.
Similar to git push, you can pull from a certain remote branch if you wish, or just use the defaults:
$ git pull <remote> <branch>
For example, if you wanted to pull changes from the units branch, you would write:
$ git pull origin units
From https://github.com/omega9656/learn-code
 * branch            units      -> FETCH_HEAD
Updating 33727bf..67616c1
Fast-forward
 docs/changelog.md                                  |   8 +-
 docs/learn/unit7/command-line.md                   | 476 ++++++++++++++++++++-
 docs/learn/unit7/exception-handling.md             | 365 +++++++++++++++-
 docs/learn/unit7/git/branching.md                  | 393 +++++++++++++++++
 docs/learn/unit7/git/changes-to-code.md            | 124 ++++++
 .../unit7/git/fixing-mistakes-time-traveling.md    | 176 ++++++++
 docs/learn/unit7/git/git.md                        | 138 ++++++
 docs/learn/unit7/git/github.md                     |  53 +++
 docs/learn/unit7/{git.md => git/gitignore.md}      |  15 +-
 docs/learn/unit7/git/logging.md                    | 117 +++++
 docs/learn/unit7/git/other-useful-stuff.md         |  23 +
 docs/learn/unit7/git/working-with-remotes.md       |  25 ++
 create mode 100644 docs/learn/unit7/git/logging.md
 create mode 100644 docs/learn/unit7/git/other-useful-stuff.md
 create mode 100644 docs/learn/unit7/git/working-with-remotes.md
 create mode 100644 src/com/omegarobotics/unit7/lessons/exceptions/TestCircle.java
 create mode 100644 src/com/omegarobotics/unit7/lessons/exceptions/TestException.java
Of course, you should only use git pull if you’ve committed all of your changes and are ready to merge. (Also, since you are merging, there may be merge conflicts that you will need to resolve.)
Also notice the output is similar to when you merge, because that’s basically what a git pull is doing (in addition to fetching).
Basic Git Workflow
Every programming team has different protocols and practices, especially when it comes to how they use Git. Below is a basic framework that any team can adhere to in order to have a smooth workflow.
- Modify files on local
- Add modified files to staging area
- Commit staged files
- Fetch + merge (safer) OR pull (less safe)
- Handle merge conflicts and/or repeat steps 1-3 (if you want)
- Fetch + merge OR pull (again)
- Why do I need to do this? In the time you completed step 5, the remote could’ve changed, which is why you need to sync changes with remote again
- Do steps 5-6 again as needed
- Push local changes to remote
Another thing to note about is that it is highly recommended for any new changes to be committed to a branch instead of working directly on master. master is typically treated as a protected branch which only contains stable, working code and should not be polluted by experimental fiddling.
Only merge a branch into master if you are very sure that your code works and won’t mess anything up.